
Archive for the ‘Recipe of the Month’ Category
 I don’t know about you, but I’m a snacker. Adam is a 3 meals a day sort of person and often will even forget to eat some of those, yes I yell at him for this! I on the other hand need to eat something every couple of hours or I get crabby, something my closest friends and family know all to well. A snack I have always loved is granola bars, now that I’m in my older wiser years I try to buy bars with more natural ingredients and that will actually hold me over a bit longer, Kashi, Luna, Clif, etc. That being said I still have a sweet spot for those good ol’ Quaker Chewy Granola Bars, the Peanut Butter Chocolate Chip to be exact, that my mom always used to have on hand for me. Although I now equate them to a “healthy candy bar,” they still do in a pinch and let’s face it, probably a healthier snack than other things I could choose. Granola bars in any form just bring me back to being a kid and I find them to be one of the most perfect snacks.
For as much I enjoy granola bars, I honestly have never considered making my own, so I was intrigued while I was watching Food Network laid up in bed last week to see Giada De Laurentiis making her version of Peanut Butter Chocolate Chip granola bars. They looked delicious and although maybe more calories, definitely all natural ingredients. I figured I would give them a go.
Peanut Butter Granola Bars
Recipe courtesy Giada De Laurentiis
- Prep Time:
- 15 min
- Inactive Prep Time:
- 1 hr 0 min
- Cook Time:
- 15 min
- Level:
- Easy
- Serves:
- 24 bars
Ingredients
- Vegetable cooking spray
- 1 egg white
- 1/2 cup chunky peanut butter
- 1/3 cup brown sugar
- 1/4 cup honey
- 1/2 cup (1-stick) unsalted butter, melted
- 2 cups old fashioned oats
- 1/4 cup slivered almonds, toasted, *see Cook’s Note
- 1/3 cup miniature chocolate chips
Directions
Position an oven rack in the middle of the oven. Preheat the oven to 350 degrees F.
Spray a 7 by 10 3/4-inch nonstick baking pan with vegetable cooking spray. Lay a 6 by 18-inch piece of parchment paper in the pan, allowing the excess paper to hang over the sides. Spray the parchment paper lightly with cooking spray.
In a medium bowl, using a hand beater, beat the egg white until frothy. Stir in the peanut butter, brown sugar, and honey. Add the melted butter, oats and almonds. Stir to combine, then add the chocolate chips.
Using a rubber spatula, spread mixture into the prepared baking pan, pressing lightly to form an even layer. Bake until the edge of the mixture begins to brown, about 15 minutes. Remove from the oven and let cool for at least 1 hour. Cut into 1 1/2-inch squares and serve.
*Cook’s Note: To toast almonds, arrange in a single layer on a baking sheet. Bake in a preheated 350 degree F oven until lightly browned, about 8 to 10 minute
This recipe came together so easily, with nothing more difficult than adding the ingredients one by one and stirring. I must admit that I had to restrain myself from eating the creamy batter, because it actually looked that good. But for how creamy that batter was, I was skeptical about how these were going to bind together.


You will notice that the recipe tells you to lay down a layer of wax paper and spray that with non-stick spray before spooning the batter into the pan, this is allow you to easily remove the granola bars when they have set. After the 20 minutes they were supposed to cook, I noticed that because of the wax paper, my bars were not really cooking through properly, so I opted to remove the paper and re-cook them until the edges had browned. The directions also explain that these need to set for an hour after they are cooked so that they can settle. Well when I went to cut these after an hour, I was surprised because they were still pretty gooey and not quite as adhered as granola bars you would think of, but I was able to still cut them into bars and serve myself one.

Let’s just say these are not your typical granola bar, I would equate it’s texture to more like a mix between a gooey brownie and really yummy soft oatmeal cookie. So although these turned out vastly different than what I was imagining, they were still utterly delicious. So delicious in fact that I had to take them into Adam’s office, because I was going through them entirely too quickly. I am coming to the conclusion that these probably will never again be made for a “healthy” snack, but rather when I am craving something sweet.
TASTE: It’s safe to say since this pan of brownies, whoops I mean granola bars were polished off in about 2 days that everyone who tried them thoroughly enjoyed them. Although these are far from your “typical” granola bar, they were definitely a sweet treat with some healthy add ins to make you at least feel a bit better about yourself while mowing down! And for those of you with kids, these are a sweet treat you can feel good about them eating.
EASE OF PREPARATION: As I mentioned above, these were a cinch. The most work that was required was toasting the almonds for a bit on a cookie sheet and melting the butter. Other than that, it was just a matter of mixing all the ingredients together and baking, so simple if you do have kids around, these would be a great recipe they could help you with.
COST: Although we didn’t have the ingredients on hand, because we were down to bare bones, every ingredient is something I usually keep around. But since we had to buy everything, I was glad that no ingredient was obscure or expensive and you could easily get 2-3 batches out of what you buy.
COMPLEXITY: Like I said above, these were very simple to put together. Now if you are looking to make these stick together a bit better, the comments listed online under the recipe list a bunch of variations that others have tried and allowed these bars to come together and hold their shape a bit better. I am undecided as to if I would want them to be different, more granola bar like, because I really did like the chewy brownie like texture, but I know if I decide to there are endless possibilities.
PORTION SIZE: While the recipe says it will yield 24 bars, I used a different size pan and was only able to get 16 bars, so I’m not entirely sure how Giada ever got 24. But either way, these bars are small, yet back a big punch. They are sweet enough to satisfy any sweet tooth and have enough staying power to make a somewhat decent snack.
Overall, while at first I felt as if the recipe came out completely wrong, I was pleasantly surprised with their taste even though they were so different. These were a big hit with Adam too and a dessert that you feel “good” about eating, so I think these will definitely be making another appearance in our kitchen and definitely earned 4 1/2 Little Piggies.
![]()
![]()
![]()
![]()
![]()
 Can we just say that winter is completely hard core this year! I mean I am starting to feel like I should expect snow every day, because that is pretty much what it’s been like around here. Now I would not say that I am suffering from seasonal affective disorder quite yet, but I am noticing I am much less motivated to do anything that requires leaving the house, and well there is that whole comfort food thing, it is certainly in full force lately!
When it is especially cold and crummy out, thick soup or chili are very appealing, both for the warm factor as well as they are dishes you can eat slowly and savor. One soup I have always loved is French Onion, the richness of the cheese, those softening croutons that soak up the flavor, and if it’s made right, a broth that is truly savory. I have tried many, many bowls of this soup in my day and I must admit that I think I have become some what of a critic. Unfortunately, not every bowl of this delicious soup is the same and I think the French would be down right outraged at some of the imposters with its name. And while I have tried many versions of this dish, both good and bad, I have honestly never attempted to make it myself, not that I thought it would be hard, but I assumed a dish (with hopefully those flavor nuances) would take a bit of time to achieve, and frankly I can be lazy sometimes.
So when I was deciding what recipe to try out this month, I took one look out the window and I knew what was in order, I was going to see just what all goes into making French onion soup. Also, Adam has been on a real French onion soup kick lately, so I thought I would see what he thought of mine, well Tyler Florence’s, but my version of that.
French Onion Soup
Recipe courtesy Tyler Florence
- Prep Time:
- 15 min
- Inactive Prep Time:
- —
- Cook Time:
- 55 min
- Level:
- Easy
- Serves:
- 4 to 6 servings
Ingredients
- 1/2 cup unsalted butter
- 4 onions, sliced
- 2 garlic cloves, chopped
- 2 bay leaves
- 2 fresh thyme sprigs
- Kosher salt and freshly ground black pepper
- 1 cup red wine, about 1/2 bottle
- 3 heaping tablespoons all-purpose flour
- 2 quarts beef broth
- 1 baguette, sliced
- 1/2 pound grated Gruyere
Directions
Melt the stick of butter in a large pot over medium heat. Add the onions, garlic, bay leaves, thyme, and salt and pepper and cook until the onions are very soft and caramelized, about 25 minutes. Add the wine, bring to a boil, reduce the heat and simmer until the wine has evaporated and the onions are dry, about 5 minutes. Discard the bay leaves and thyme sprigs. Dust the onions with the flour and give them a stir. Turn the heat down to medium low so the flour doesn’t burn, and cook for 10 minutes to cook out the raw flour taste. Now add the beef broth, bring the soup back to a simmer, and cook for 10 minutes. Season, to taste, with salt and pepper.
When you’re ready to eat, preheat the broiler. Arrange the baguette slices on a baking sheet in a single layer. Sprinkle the slices with the Gruyere and broil until bubbly and golden brown, 3 to 5 minutes.
Ladle the soup in bowls and float several of the Gruyere croutons on top.
Alternative method: Ladle the soup into bowls, top each with 2 slices of bread and top with cheese. Put the bowls into the oven to toast the bread and melt the cheese.
I must admit I was immediately impressed that this dish takes about an hour to create, soup with ingredients that take that while to put together and simmer must be good. But to start I had the fun task of slicing up 4 onions, now the recipe did not specify what type, but I tend to prefer sweeter onions in this dish, so I went with yellow. From there its’ time to melt the butter over medium heat with the garlic, bay leaves, and thyme and cook down the onions for 25 minutes. I decided to forgo buying fresh Thyme for this dish and just use dried (since the rest of it typically goes to waste), it worked out just perfectly and I thought tasted just as wonderful, but we’ll get to the taste lata!


At first I was skeptical when I put the onions in that it would only take 25 minutes for them to cook down, but when the timer hit 25 minutes, they were perfect and smelled wonderful. After that time they were caramelized, and it was time to add one cup of red wine, I just grabbed a dry one that we already had on hand.


The recipe stated that it would take about 5 minutes for the wine to cook off, It actually took about 10 in my case, you just want to make sure the onions are devoid of most of the liquid, that will be how you can determine they are ready. Now it is time to add the flour, which you cook off over a low heat for 10 minutes. And then the final step, add the beef broth and simmer for 10 more minutes.


So all of that labor of love is really just getting those onions and broth ready and flavorful, the next step adds the pizazz and creaminess. Tyler explains two ways you can top your soup, either sprinkle the cheese on the French bread croutons and brown them in the oven before adding them to the soup or place soup, croutons, and cheese under the broiler to bubble, I chose the boiler route so the soup would be nice and hot and that cheesy to be extra bubbly.
I brought French bread that was already sliced, so it was not crispy to start, which is not what you want with this soup as you don’t want it to get too soggy too fast. So I cooked my slices for about 10 minutes at 350 with a little olive oil, you can determine if this is necessary based on the bread you purchase. I actually did this step while the broth was still cooking, so they would be ready when it was time to place all of the pieces together.
To assemble I ladled all of the soup into 4 large bowls, placed 3 croutons on 2 of bowls, sprinkled A LOT of gruyere cheese on top, and placed those 2 bowls under the broiler. We decided to save the other 2 bowls without the toppings, so it would be fresh when we wanted to eat these leftovers.


Let me just say now, these bowls were huge. We probably could have divided this dish further and created 6 or 8 portions, but our eyes were bigger than our stomachs, but although filling, it was super delicious and just what we wanted on a cold snowy night.
TASTE: Well considering I practically licked my bowl clean and was stuffed for about the next hour, it is safe to assume it tasted good. Not only was this the perfect blend of broth, onions, croutons, and cheese, the broth itself was exactly how you want it to taste. It was a rich beefy flavor, but the addition of thyme really made the flavor go above and beyond. And the sweet onions were the perfect complement and there were plenty of them, which some soups of this variety seem to often lack. At first Adam was skeptical there was enough cheese because it was shredded, but he quickly changed his tune when he began to dig to the bottom.
EASE OF PREPARATION: Although I was convinced that soup that takes an hour or more to make could become difficult, this dish really wasn’t. I love that a dish that has this much flavor is really not too hard to create, rather it just takes tending to and making sure the ingredients are added at the right time and simmered enough.
COST: For the most part this dish is not very expensive to create, another great feature, a dish that seems gourmet, but does not cost a lot. The only ingredient that was borderline expensive was the gruyere cheese, but when you divide it up among how many servings this creates it works out to be pretty cost effective. And outside of the cheese, this soup really does not require a lot of ingredients. We did decide that next time, we likely would choose a different cheese though, because although the gruyere was tasty, it is almost too melty and creamy (I know almost impossible), but this stuck to the insides of our mouths a little too much, so again a different cheese could cut down on the cost.
COMPLEXITY: As I mentioned above although time consuming, this dish isn’t very difficult at all. I am so glad to know now that I could easily whip up some of this deliciousness when I have time.
PORTION SIZE: As you can see from those bowls, we ladled this soup out into 4 very large portions and just had that be our dinner. Even just eating the soup, we were totally full and Adam regretted munching on some food before this, because he filled up too fast. But it is safe to say that this recipe could easily feed 8 if you were serving it up as an appetizer before a meal.
This soup will surely be staple in my repertoire from now on, it was that good, so good in fact that although I might tweak the cheese I don’t see the point in venturing to try other broths because this was amazing. We truly enjoyed this dish and are certainly excited that there are leftovers.** This dish was a real winner and I am glad to give it 4 1/2 Little Piggies.
![]()
![]()
![]()
![]()
![]()
** We did enjoy those leftovers 2 nights later and I was so impressed how easily this dish saved and reheated. If you are planning to save some I would say save the broth itself separate from the toppings, so they don’t get soggy. However, just heating this up, it tasted just as good as the first try, a definite keeper!
 It’s that time of year isn’t it? Where we feel bombarded by food and drink and leftovers seem to abound; and although Adam and I happen to be those people who do like leftovers, there are times when you can only eat the same thing over and over for so long. But because we had steaks and a 21 pound turkey on Thanksgiving, let’s just say we had quite a bit of meat leftover.
Now one of my favorite Post-Thanksgiving or Christmas traditions are fresh turkey sandwiches made from the leftovers. I love them with a bit of cranberry sauce or even spiced up with other flavors…the possibilities are endless. Still, after a weeks worth of sandwiches and still a ton of turkey left, we were starting to get a little sick of the monotony. So what a better way to add some excitement into the mix than to find some new recipes that we could use the turkey for.
After a huge heavy meal like Thanksgiving, I really should be trying to find a recipe for some type of salad, but not this time…I knew exactly what I wanted to do with that turkey…POT PIE! I must admit that I’m not a typical pot pie lover, largely because I have always thought of them as being overly bad for you and steered clear. However, as I have gotten older, I have begun to realize that life is too short and we need a little rich food in our lives once in awhile. And who better to go to when it comes to rich food than Paula Deen. I mean the woman loves her some comfort food! ;) And since I have yet to try making any recipe of hers, I thought I would see what she had to offer in the pot pie department. Well lucky for me the recipe I stumbled across on Food Network is her famed ‘Lady and Son’s’ Chicken Pot Pie that is an entree at her family restaurant; and at $18.99 on the menu, this dish better knock it out of the park!
Thus, I thought this would be the perfect opportunity to try a dish of hers and see what pot pie is really all about. We all know Paula likes her some rich ingredients so I was fully prepared for this not to be light. I also was going to be using turkey instead of chicken…I mean the whole purpose was to use up some of all that bird we had, right?
‘Lady and Sons’ Chicken Pot Pie
Recipe courtesy Paula Deen
- Prep Time:
- 20 min
- Inactive Prep Time:
- Cook Time:
- 30 min
- Level:
- Easy
- Serves:
- 4 servings
Ingredients
- 4 sheets frozen puff pastry
- 1 egg, beaten
- 4 chicken breast halves, or 2 cups leftover cooked chicken
- Seasoned salt and pepper
- 2 tablespoons cooking oil
- 1/3 cup butter
- 2/3 cup all-purpose flour
- 1 quart heavy cream
- 1/4 cup chicken base
- 1 tablespoon minced garlic
- 1/2 small yellow onion, minced
- 1 cup frozen green peas, cooked
- 1 cup chopped cooked carrots
- Pinch fresh grated nutmeg, optional
- Special equipment: 4 (2-cup) individual baking dishes
Directions
Preheat oven to 350 degrees F.
Cut each sheet of frozen puff pastry into 1-inch strips, 8 inches long. On a large cookie sheet, weave strips into a lattice large enough to cover each pot pie. Brush beaten egg onto each lattice square. Bake for 5 minutes, or until dough has risen and turned light golden brown. Set aside until ready to assemble pies. Leave oven on at 350 degrees F.
Filling:
Season chicken with seasoned salt and pepper. Heat oil in a large skillet over medium-high heat. Add chicken and saute until cooked through. Remove from heat and cut into chunks. Alternatively, you may use precooked chicken.
In a large saucepan, melt butter and then slowly add flour, stirring until consistency of peanut butter, but not brown like a roux. Slowly add cream and keep stirring. Add chicken base, garlic, and onion and stir until thickened. Add peas, carrots, nutmeg, if using, and cut up chicken. Remove from heat. Fill 4 individual oven-proof bowls with chicken mixture and then top each with a pre-cooked lattice square. Bake for 5 minutes or until bubbly. Any remaining pie filling may be frozen.
I cut this recipe in half to only make two pies. I figured they would be big and filling enough that we likely wouldn’t eat a whole pie (and oh was I right!…which I’ll get to). So when I got going I really wasn’t sure what to expect from this recipe. From the looks of the ingredients, I knew it must be rich from the amount of cream and butter it needed, but I was interested to see the consistency. Adam eats those frozen pot pies from time to time and they always seem to be a tad runny inside the pie crust, so I was dying to see what Miss Paula came up with. I was also intrigued by the fact that she uses puff pastry as the crust and I wasn’t sure if I would like that twist or not.
So, I moved on and began by pouring a glass of wine (always a good first step ;)), chopping up the veggies, and thawing the puffy pastry. After the pastry is thawed, it is cut and made into a lattice shape and baked.


I must admit at this point I was getting excited because I do love some puffy pastry. It did seem a bit excessive to use an entire sheet of pastry for one pie, but I figured it was worth it so I went with it.
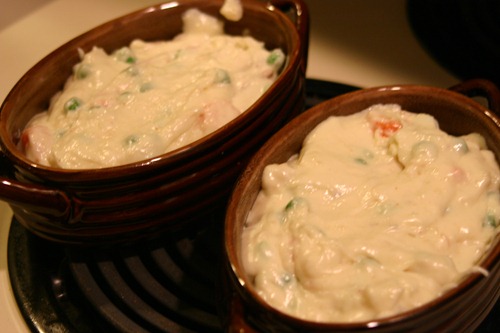
This dish actually comes together really quickly and once you start adding all of the ingredients together, the pie filling comes together fast. And when it is ready to go in the baking dishes, it has the consistency of mashed potatoes…THICK; and what is so odd is there are no potatoes involved, just butter, flour, and cream. With the addition of peas, carrot, and onion, this mixture was ready for the individual baking dishes and the puff pastry topper. Finally, the pies then go back in the oven where they get all bubbly and the “crust” browns a bit.


 Looks good huh? I presented this in front of Adam and his eyes just lit up, and I must admit it sure does come out pretty. The lattice puff pastry just gives it some flair. But underneath, this dish was comfort food on steroids for sure…way tasty! Paula is not messing around when it comes to the richness. But as I said before…everything in moderation is the key.
As we dug in, I was taken over by the flavor…it is rich for sure, but the addition of nutmeg surely gives it a comfort sweet taste. The puff pastry is lighter than a regular crust, which really is a nice complement to the heaviness of the filling. Still, this dish IS VERY heavy! Both of us could only get through half of our pies; and when we were done we both agreed it really needed more turkey, or chicken, or whatever meat you are using. In fact, I would almost double what Paula says, because it would really cut down on the creaminess.
TASTE: This dish was certainly no short of amazing. Paula truly does know her stuff; and although heavy ingredients, they certainly do give this dish the right taste and texture. Let’s be honest, with a dish like pot pie, you really don’t want to go light. It’s go big or go home in my book and this is definitely the ‘Go Big’ version. So between the texture and the puff pastry, you certainly have a dish that screams comfort and warmth!
EASE OF PREPARATION: I was surprised at just how easy this dish was to put together. I have to admit I have never made a rue before, but that is essentially what the beginning stages of this dish are. You do have to watch it pretty closely and keep stirring, but before long it is crazy how this goes from a few ingredients to pure amazingness.
COST: These pot pies are easy on the wallet too. Considering we had the turkey, butter, and flour on hand, all I needed was the puff pastry, veggies, and cream, none of which were outrageous. And even if you had to buy all of the ingredients, none of them are very costly; and since this can easily make one large pie to feed a crowd, it is fairly cost effective.
COMPLEXITY: None of the tasks required are hard at all…, really just a lot of stirring and adding an ingredient here or there. It is amazing how pretty this looks when it comes out, because a child could really make this. The lattice shaped crust, I think, are what make this dish go from simple to purely gourmet.
PORTION SIZE: As I mentioned above, this dish is heavy and filling. We could each only eat half of our pies, so just two pies could easily feed a few people and they would be satisfied. You could also make a large pie and serve a salad alongside for a great complete meal. 😉
So I’ll say ii again, the creaminess was good, just needed another stronger contrasting flavor and texture. But overall, I was totally impressed by this dish; and although I wouldn’t want to eat it everyday, I definitely would want to make it again. I give Paula Deen’s Lady and Son’s Chicken Pot Pie 4 1/2 ‘Little Piggies.’

![]()
Stay tuned for another post this week, I am running a little behind because of the holidays, but I want you all to still enjoy some good reviews!